What is this about?
Adaptation of the Klicky/Quickdraw Probe for the Ender 3 and comparable Creality printers. The probe is compatible with all printers that use the X plate of the Ender 3. The cost of the probe is <10€, of which the switch is the most expensive part.
The probe is compatible with Marlin and Klipper. Both firmwares work with the G29 command, the docking is done automatically by the printer, it couldn’t be easier! Both firmwares add a KlackEnder menu to the display that can be used to dock and undock the Probe. The Bed-Mesh can be created via the custom menu, via the default firmware settings or with G29.
Is it compatible with my printer?
As long as your printer uses a X-Axis plate that’s similar to the one of the Ender 3: YES!*
* You might have to adapt the parts (slightly) if you’re not using an Ender 3 or the stock x-plate. See the Basic-Check section to check the basic measurements and see if you printer is compatible. If not and you really struggle with CAD just ping me on my Discord 😉
Why should I build it?
Well, as with my other mods, the focus is on the best cost-benefit ratio. The KlackEnder is very cheap and very easy to build. No need to pay 40-50€ for a probe that is still affected by heat, takes forever to mesh, and causes a lot of headaches to wire. For the Klack it’s: Print – assemble – mount – start printing, that’s it. Especially with Klipper, setup couldn’t be easier, just use my pre-made macros, copy and paste, hit restart and you’re ready for the next print.
- Compatible with Marlin and Klipper. Easy setup – firmware changes provided.
- 100% automatic probe docking and undocking.
- 100% open source parametric design! With the supported CAD file and instructions, it couldn’t be easier to customize the parts to your needs! Even if you’ve never worked with CAD before, I promise you can customize the parts any way you want!
- Custom menu to control the probe (not for Ender 3 V2 with Jyers GUI).
- The cheapest way to get a fast and very accurate probing ( sample range of 1-2 microsteps (0.000-0.005mm with 16 microsteps)
- Easy to install, no soldering, no complicated wiring
- Works with all pressure surfaces, not affected by heat, no heat soak required
Parametric CAD Design
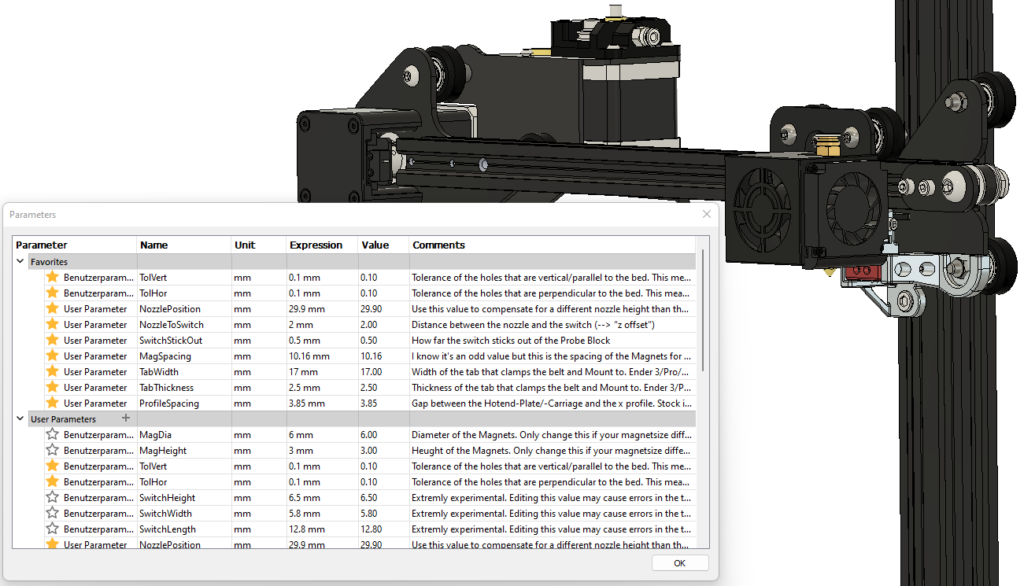
I always try my best to support a wide range of possible setups so you don’t have to deal with CAD. With this design I have gone one step further: Not only does this design support a wide range of setups, but also the CAD is very easy to adapt for anyone, even if you’ve never worked with CAD before!
How that? Parametric design!
Parametric design means that everything is based on variables / parameters which you can easily change. The design itself adapts automatically to the changes you made. This may still sound a bit complicated, but trust me, with the detailed instructions I provide, it couldn’t be easier! More about that on the next page.
What’s about the calibrate_z macro?
In case you don’t know what the calibrate_z macro is: It’s a Klipper plugin made by Protoloft for a self calibrating z offset / first layer.
This is a plugin to self calibrate the nozzle offset to the print surface on a 3D printer using Klipper. There is no need for a manual Z offset or first layer calibration any more. It is possible to change any variable in the printer from the temperature, the nozzle, the flex plate, any modding on the print head or bed or even changing the Z endstop position value in the Klipper configuration. Any of these changes or even all of them together do not affect the first layer at all.
Protoloft: GitHub
So you know what this macro does, I have good news: The KlackEnder supports calibrate_z! So far it’s available as a beta on my Discord Server, once it’s finally released it will be on this website and on my GitHub. It will require additional hardware, but if you’re interested, feel free to join Discord!
Build Instructions, Firmware, STL files and Hardware you need
This is an interactive building log that will guide you step by step through your build. I have tried my best to add as many details as possible. If you still have any questions, feel free to join my Discord Server 🙂
Note: This guide doesn’t include the older Revisions like Rev1 or Rev2.x. Rev2.1 is the most current version.
Thanks to all the BETA testers on my Discord that helped me to improve this update!
Lets start with the build!
Click on the picture below to start:
❤️ Support my work
All my work is 100% Open-Source and free for everyone to use. But designing and developing all these mods takes a lot of time and effort, so if you appreciate my work and would like to support it and also help cover the costs of gettings the mods perfect, you can use one of the following links. Thanks a lot!


FAQ
Do I need to change the firmware?
Yes, but don’t worry!
Can I use PLA to print the parts?
Yes and no. All parts should work with PLA. But the parts are close to the Hotend and the Heatbed. You can avoid the headache of a not working probe by using PETG or something better.
Is this mod also compatible with the Ender 3 V2/Pro, CR printers etc?
YES!* You can use this mod with all Ender 3 versions!
* You might have to adapt the parts slightly with the CAD if not done already by myself. See the CAD section to check the basic measurements and see if you printer is compatible. If not and you really struggle with CAD just ping me on my Discord 😉