est. 26/03/2020
Intro
Attention! I’m not an expert and 3D printing is just my hobby. So please be careful when you build this mod and don’t just go ahead. All parts are tested and working. But everybody bears the risks of a modification him/herself!
Why I made this Mod:
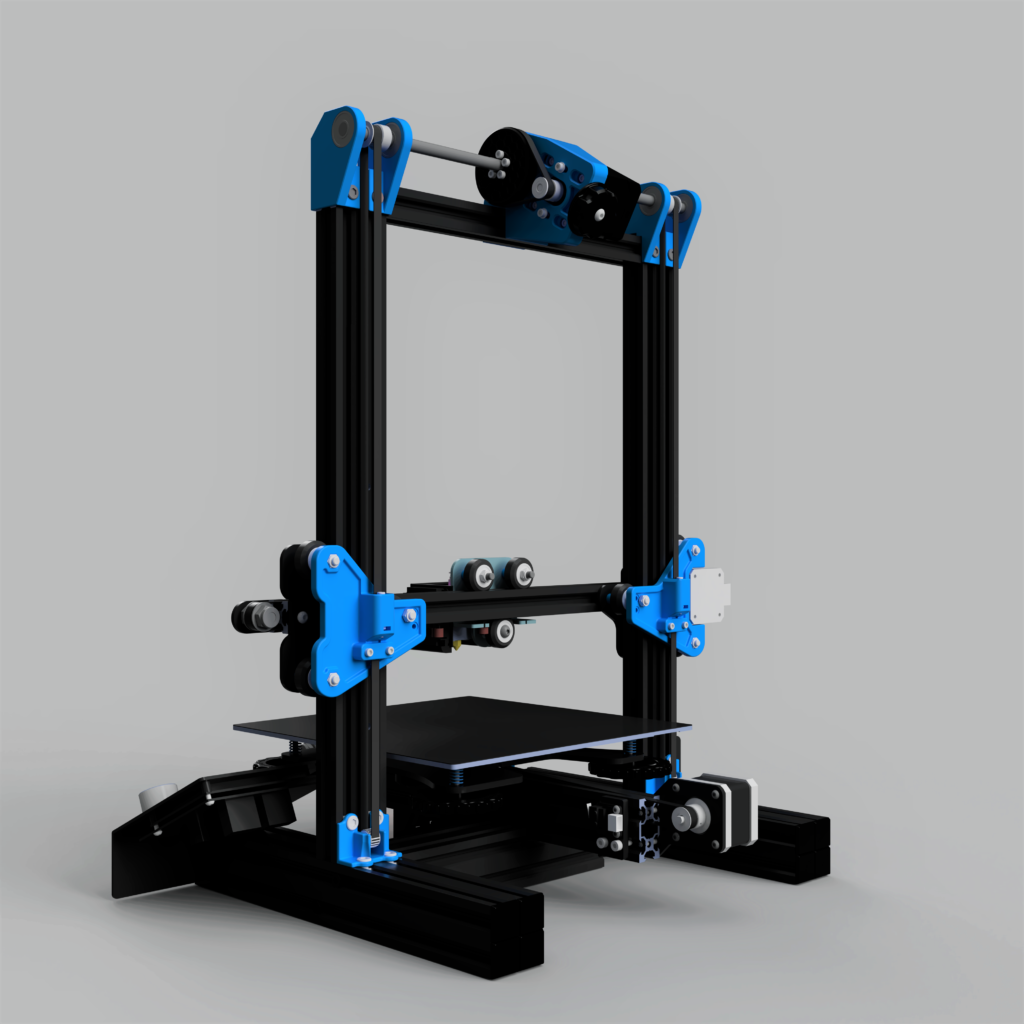
My Ender 3 always had problems with the Z-axis, which were caused by a bent and misaligned leadscrew. Therefore, I decided to convert the Ender to belts in Z as well. This mod also solves the problem of a hanging x-axis on the right side. Because of the two belts, both sides run synchronously and can also be adjusted very precisely. So, if you have these problems with the z-axis/x-axis, this is a good solution.
What this Mod can’t do:
This mod can’t solve problems that are caused by an inconsistent extrusion. Inconsistent extrusion means an untuned Flowrate/Extrusion multiplier and causes very inconsistent layers. To get rid of that you should tune all extrusion related values, like Flowrate and Linear Advance (Marlin) / Pressure Advance (Klipper). Take a look at this tuning guide, it’s very well made (Works also for non Voron Printers and Marlin machines).
Build Instructions, STL files and Hardware you need
This is an interactive building log that will guide you step by step through your build. I have tried my best to add as many details as possible. If you still have any questions, feel free to join my Discord Server 🙂
Note: The most stock, common and easiest option is always the one on the left.
Note: You’re missing something? The V3_Extras folder on GitHub lists some customazitions of the mod requested by users of my Mod, like a Heat-Insert version, MGN-9H support and so on. That’s not enough? Feel free to post suggestion on my Discord!
Lets start with the build!
Click on the picture below to start:


❤️ Support my work
All my work is 100% Open-Source and free for everyone to use. But designing and developing all these mods takes a lot of time and effort, so if you appreciate my work and would like to support it and also help cover the costs of gettings the mods perfect, you can use one of the following links. Thanks a lot!


FAQ
Do I need to change the firmware?
NO! You do not have to change anything in the firmware. This modification works with the stock board and stock firmware.
Can I use PLA to print the parts?
Yes and no. All parts should work with PLA, except the motor tensioner arm. The motor has to hold more weight now, so the motor could get warm. Since PLA deforms at ~40°C you should keep an eye on your motor (see troubleshooting). Because of that I would recommend PETG. When you’re printing inside an enclosure you should use ABS. Try Esun ABS+, super easy to print, and much stronger than PETG.
Is this mod also compatible with the Ender 3 V2/Pro etc?
YES! You can use this mod with all Ender 3 versions (Aside the S1, the E3 Max will be supported soon).
Can use this for my Creality CR printer?
View the Makes on Thingiverse. Some of you made a CR build so I think it should fit. Feel free to give some feedback about that.
Do I need a hardened steel rod?
NO! A cheap aluminium or normal steelrod is just fine. There’s also a transmission (rotated and unrotated) that hold a bearing inside, so you have some extra support in the middle of your rod. You also could use your leadscrew to minimize the costs.
So you want to use two stepper motors to have an indipendent z axis? Thats possible of course! Just use the files from the Dual Z folder! See BOM for detailed parts list.
I have a special question/ I need a custom version but I’m new to CAD. Can you help me?
Yes of course! I’m happy to help, so please contact me via Discord (kevinakasam#2097). I’m sure we will find a solution for your problem 🙂
Thank you very much if you want to support my work! But please don’t feel obligated to do so. All parts are free and open source and will stay that way! If you still want to support me, you can find a donation link at the end of the build log. Really many many thanks! 🙂
Troubleshooting
My Z motor moves in the wrong direction!
Thats a quick fix. Just remove all the pins in you motor connector that goes into the mainboard (like I showed you in my video) and insert them in the opposite order (4321 instead of 1234).
First of all: A warm or slighty hot motor isn’t a super bad thing. But you should change that. Try to lower your V-ref/Amps till the motor stays hand warm. But be careful to not reduce the current too much, or your motor will lose steps. The stock Z motor is very small so it’s a big job for the tiny motor. Don’t worry if your motor gets warm. Pro tip: If you’ve installed a direct drive solution, the stock Extruder motor can be used 😉
My z axis drops as soon as power off my printer!
Probably the most asked question, but I can promise that your axis does not have to drop! As already mentioned, the z motor is very small. Therefore the magnetic field that exists in the motor even without power isn’t very strong. But it’s strong enough to keep the axis up.
I don’t care, my axis is dropping, what can I do?
- You are using the original V-Rollers? Be sure they are properly set up. Turn the eccentric nut until the rollers are in contact with the profile. Put a little tension on the rollers, but not too much! Do not risk a flat spot of your rollers. The tension is correct when they are tight, and you can’t turn them with your finger in the same place, but the axis moves when you turn the rollers.
- You have no rollers or your axis is still dropping? Tension your long belts a little more. Increase the tension until your axis stops dropping. Be careful not to break something. But the parts can take a lot of tension. You can find some instructions for the belt tensioning at the end of the guide (or send ?belttension on my discord).
- Tension the small looped belt a bit more as well. But very carefully! Usually the tension only needs to be high enough to keep the belt from slipping over the printed wheel. But you can increase the tension a little bit. But not too much, otherwise the motor can’t turn anymore.
- That sounds too complicated? Your motor is also too hot? A solution would be a bigger motor, like the one on the X and Y axis. A bigger motor is able to hold the axis up very easily, with less tension and less heat. But as I said, this is not necessary, it also works with the original motor.
- New solution: Install the Keybak System (added 31.10.2021).