Setup: Dual Z (UltraLow) + V-Wheels + Direct Drive + F623 Bearing
You made it!
Below you will find a list of all the parts you need to build the Mod. The links for the print files will take you to my GitHub, where you can download all STLs in a zip. Below the listing of the needed parts and files you can start with the build instructions. I have tried my best to make everything as easy to understand as possible. If you still have any questions feel free to join my Discord. Please add your setup-code to the question (DuVD623). I also added my Klipper settings at the very end of the page.
Bill of Materials:
Printed parts you need:
Hardware parts you need:
| Category | Component | Quantity | Reuse from Printer? | Notes | My Source |
|---|---|---|---|---|---|
| Motion | 20T Pulley - 8mm Bore | 4 | no | One for each side, one for each printed 80T Gear. | DFH.fm Full Kit (US) Powge Motion Kit (Aliexpress) |
| 16T Pulley - 5mm Bore | 2 | no | Motorshaft | ||
| Gt2 Belt | 2 Meter | no | Don't buy the cheapest. You should go for belts with glassfiber. Width: 6mm | ||
| 188mm Looped Belt | 2 | no | Width: 6mm | ||
| F623 bearing | 4 | no | 2 bearings per side. Size: 3*10*4mm | ||
| 608 Bearing | 4 | no | Do you have an old skateboard? You can steal the bearings from the wheels 😉 | ||
| 8mm Rod | 2x 65mm | no | Just go to your local hardware store and take a cheap 8mm (aluminium) rod. You don't have to buy a hardened steel one. (expensive and hard to cut) | ||
| 3mmx14mm Pins/Shaft | 2 | no | It's very important to get pins with the tolerance class H6 or H7. Most pins are M6 which wouldn't fit. You can also use the old bottom parts which used M3x20mm screws instead of pins. | ||
| Fasteners | M5x8mm | 22 | no | Add 6 for PowerSupply holder if needed. Any type of M5x8mm screw can be used. | Aliexpress |
| M5x30mm | 2 | no | |||
| M5x40mm | 6 | yes (3 x) | Screwhead must fit under the extrusion from the X-Axis. (Take a look at 5:20 of my video) You also could use a stock 40mm screw from the left side of the printer and place this on the inside of the right side. This way you can use any type of screwhead for the remaining holes. | ||
| M5 lock-nuts | 7 | no | |||
| M5 T-nuts | 22 | no | Add 6 for PowerSupply hodler if needed. | Aliexpress | |
| M3x25mm | 2 | no | If you have no screws, you should buy a kit. (Just an example. I haven't tested this Kit!) | Aliexpress | |
| M3x12mm | 4 | no | |||
| M3x10mm | 4 | no | |||
| M3x8mm | 8 | no | |||
| M3x6mm | 10 | no | |||
| M3 nuts | 10 | no | |||
| M3 washer | 4 | no | Not included in the kit I linked. | ||
| Electronics | Motor extension cable | 2 | no | The original Cable is obviously too short^^ The linked cable is just an example, any motor cable would work with the white JST-XH connectors on the end. Check if the middle cables are crossed!!! If your motor is moving in the wrong direction rotate the plug by 180° (--> change the order of the cables in the plug from 1234 to 4321) or change the motor direction in firmware. | Aliexpress |
| Filament | Petg or ABS (+) | ~ 500 g | no | Yes you can use PLA, but you shouldn't 😉 If you have an enclosure, use ABS. |
Vendors
Note: The Kits are highly recommended! With the kits you get tested and matching parts (rod and bearing tolerances; but most importantly matching belt and pulley teeth).
With your help, this mod has grown bigger than I could have ever dreamed! I am very happy that two great vendors are selling kits for my mod:


!Note for Powge! Check before you start the build: Recently some Powge kits arrived with wrong hardware, eg. a 20T-5mm bore pulley instead of the 16T-5mm bore (for the motor) or a 202mm looped belt instead of a 188mm looped belt. While you can fix the Pulley problem by changing the steps (400-->320 steps for Marlin, 80:20 gear ratio (rotation distance of 40) for Klipper) the looped belt requiers a modified transmission body (remix is on Thingiverse)
Build instructions
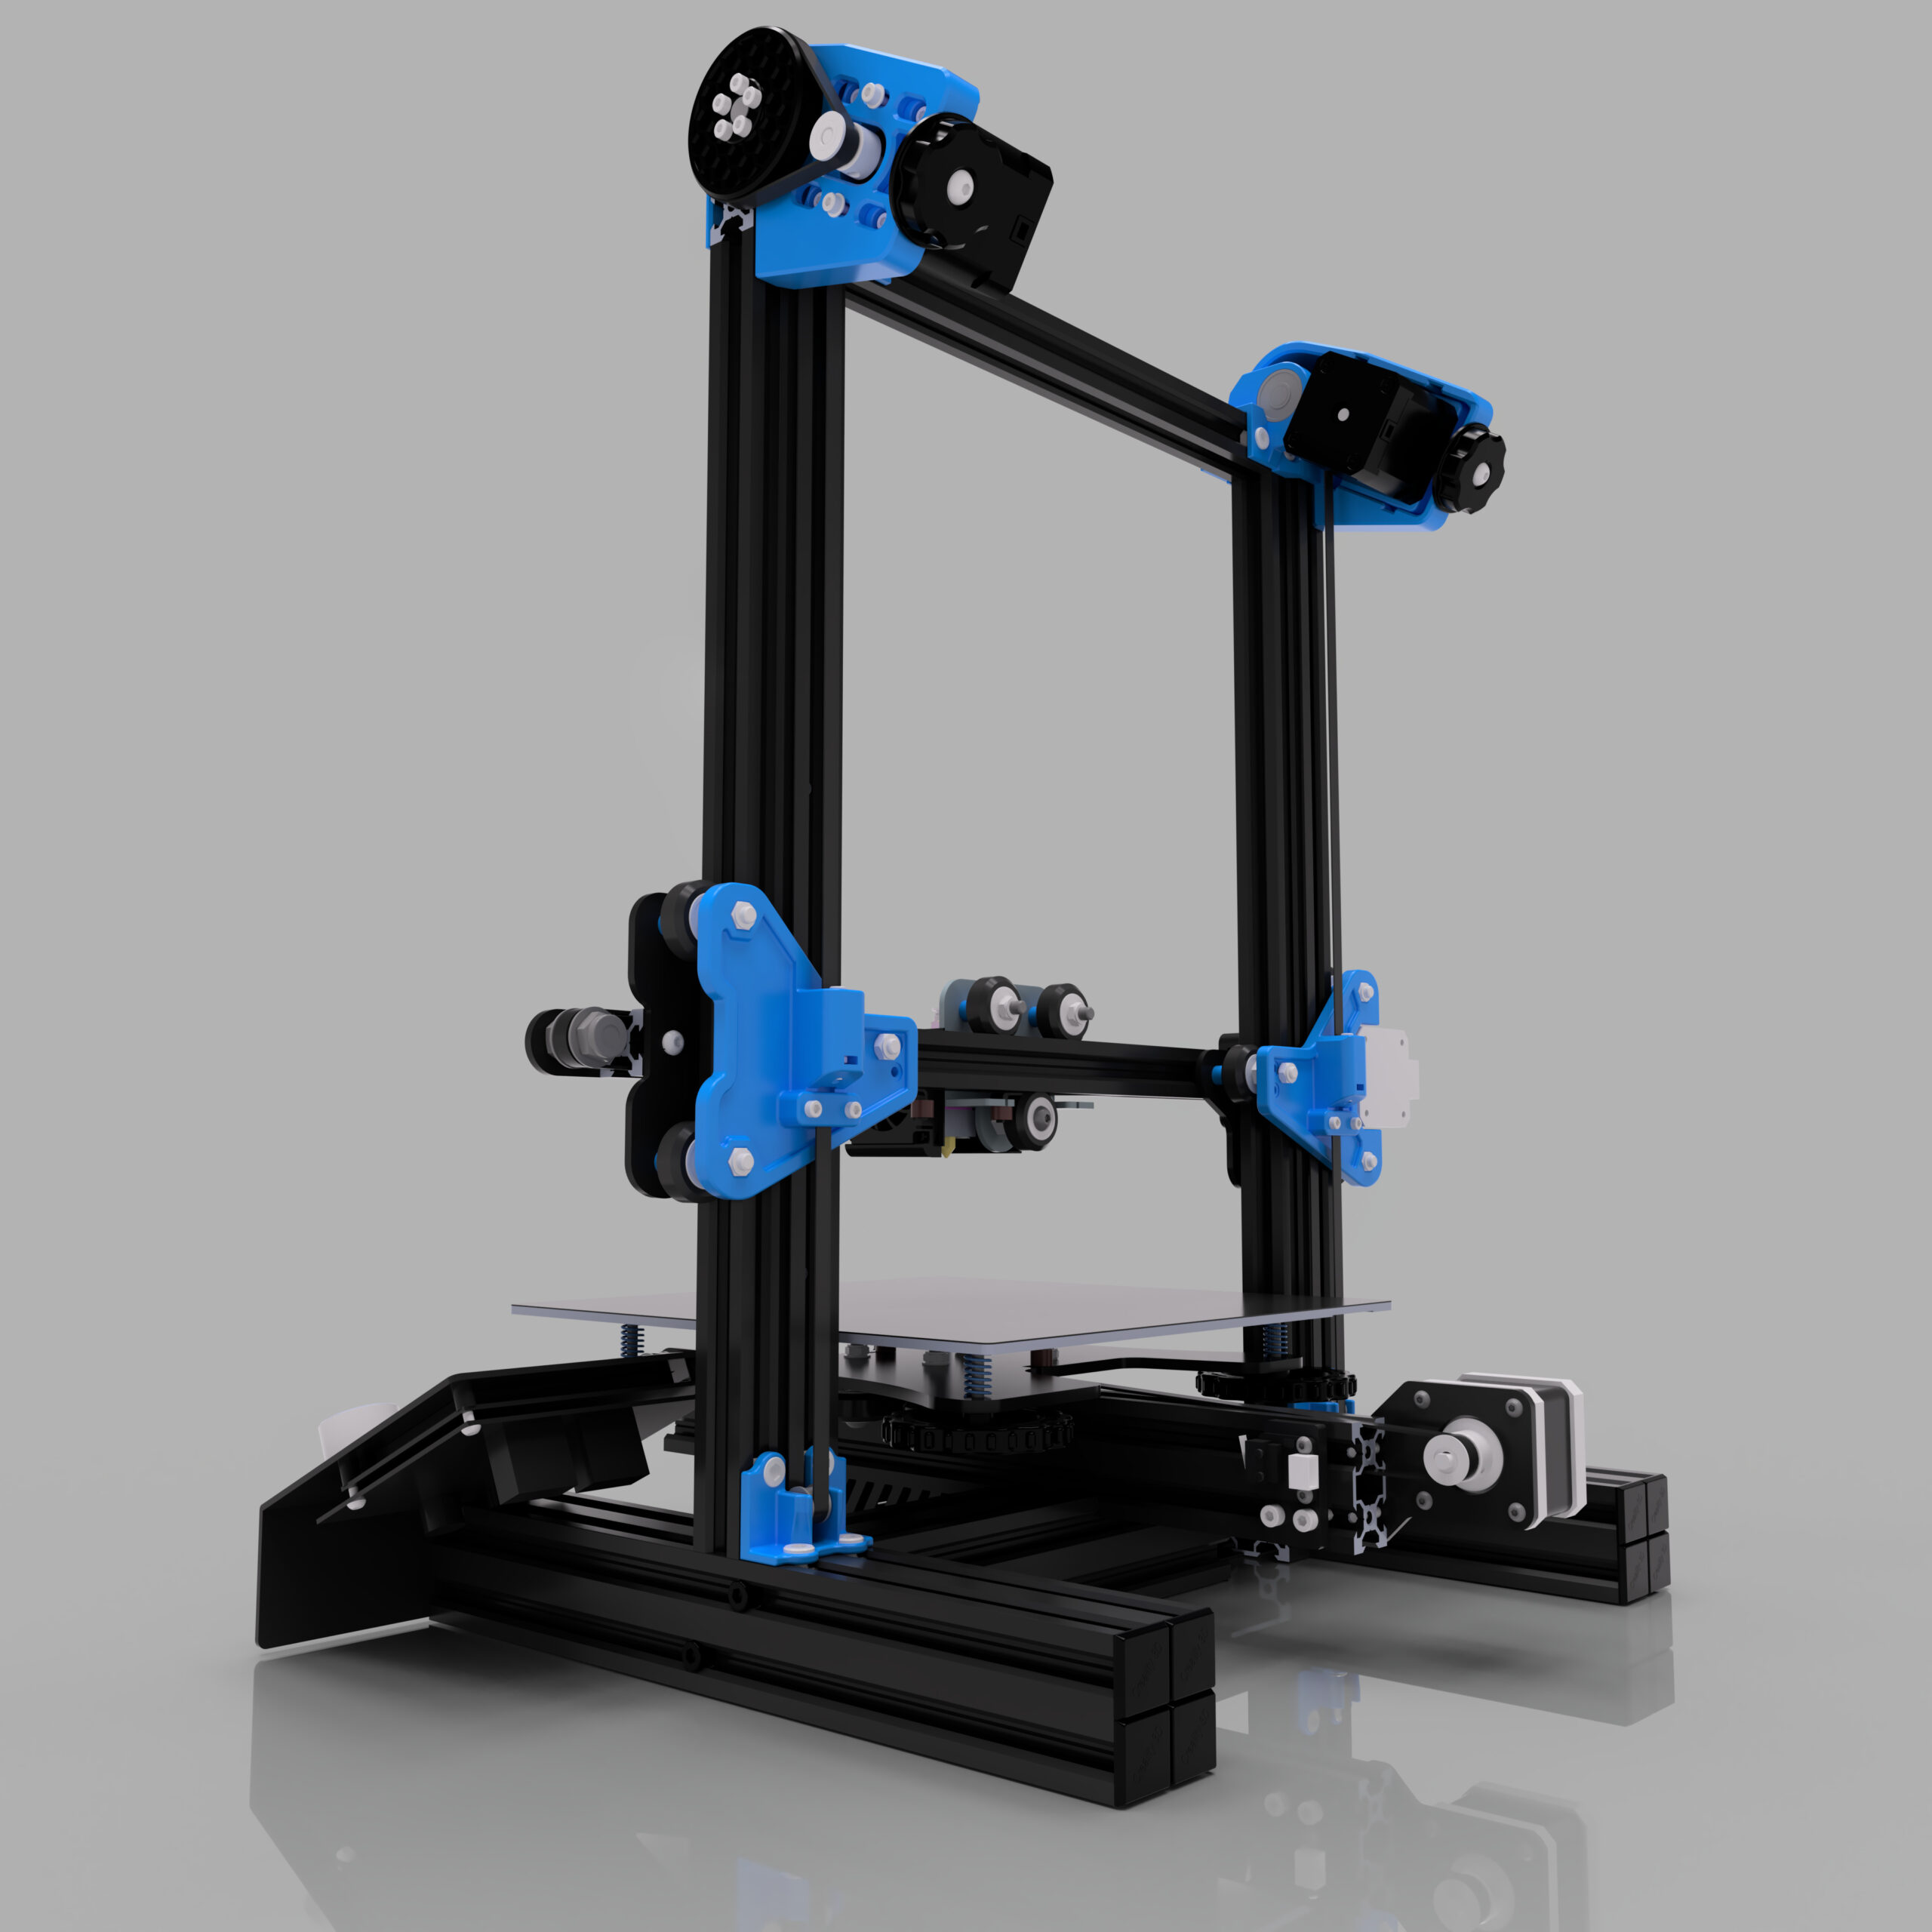
The picture shows how your Ender will look like in the end. The build is divided into individual chapters which you can select by clicking on the image. Just click on the section you want to build. The instructions will open in a new tab, so after you finished the chapter you can select the next one on this page.


Klipper Config
Example Config for Dual_Z with G34/ Tilt_Z:
!!PLEASE ADAPT THE PINS!!
[stepper_z]
step_pin: YOUR_PIN
dir_pin: YOUR_PIN
enable_pin: !YOUR_PIN
microsteps: 16
rotation_distance: 40
gear_ratio: 80:16
full_steps_per_rotation: 200 #200 for 1.8 degree, 400 for 0.9 degree
endstop_pin: YOUR_PIN
position_max: 250
position_min: -8
homing_speed: 25
homing_retract_dist: 5.0
# Distance to backoff (in mm) before homing a second time during
# homing. Set this to zero to disable the second home. The default
# is 5mm.
homing_retract_speed: 10
# Speed to use on the retract move after homing in case this should
# be different from the homing speed, which is the default for this
# parameter
second_homing_speed: 5
# Velocity (in mm/s) of the stepper when performing the second home.
# The default is homing_speed/2.
[stepper_z1]
step_pin: YOUR_PIN
dir_pin: YOUR_PIN
enable_pin: !YOUR_PIN
microsteps: 16
rotation_distance: 40
gear_ratio: 80:16
full_steps_per_rotation: 200 #200 for 1.8 degree, 400 for 0.9 degree
[z_tilt]
z_positions:
0,117
235,117
# A list of X, Y coordinates (one per line; subsequent lines
# indented) describing the location of each bed "pivot point". The
# "pivot point" is the point where the bed attaches to the given Z
# stepper. It is described using nozzle coordinates (the X, Y position
# of the nozzle if it could move directly above the point). The
# first entry corresponds to stepper_z, the second to stepper_z1,
# the third to stepper_z2, etc. This parameter must be provided.
points:
8,96.5
219,96.5
# A list of X, Y coordinates (one per line; subsequent lines
# indented) that should be probed during a Z_TILT_ADJUST command.
# Specify coordinates of the nozzle and be sure the probe is above
# the bed at the given nozzle coordinates. This parameter must be
# provided.
speed: 100
# The speed (in mm/s) of non-probing moves during the calibration.
# The default is 50.
horizontal_move_z: 15
# The height (in mm) that the head should be commanded to move to
# just prior to starting a probe operation. The default is 5.
retries: 10
# Number of times to retry if the probed points aren't within
# tolerance.
retry_tolerance: 0.01
# If retries are enabled then retry if largest and smallest probed
# points differ more than retry_tolerance. Note the smallest unit of
# change here would be a single step. However if you are probing
# more points than steppers then you will likely have a fixed
# minimum value for the range of probed points which you can learn
# by observing command output.